Milk Bar Banana Layer Cake » Hummingbird High

About This Milk Bar Banana Layer Cake
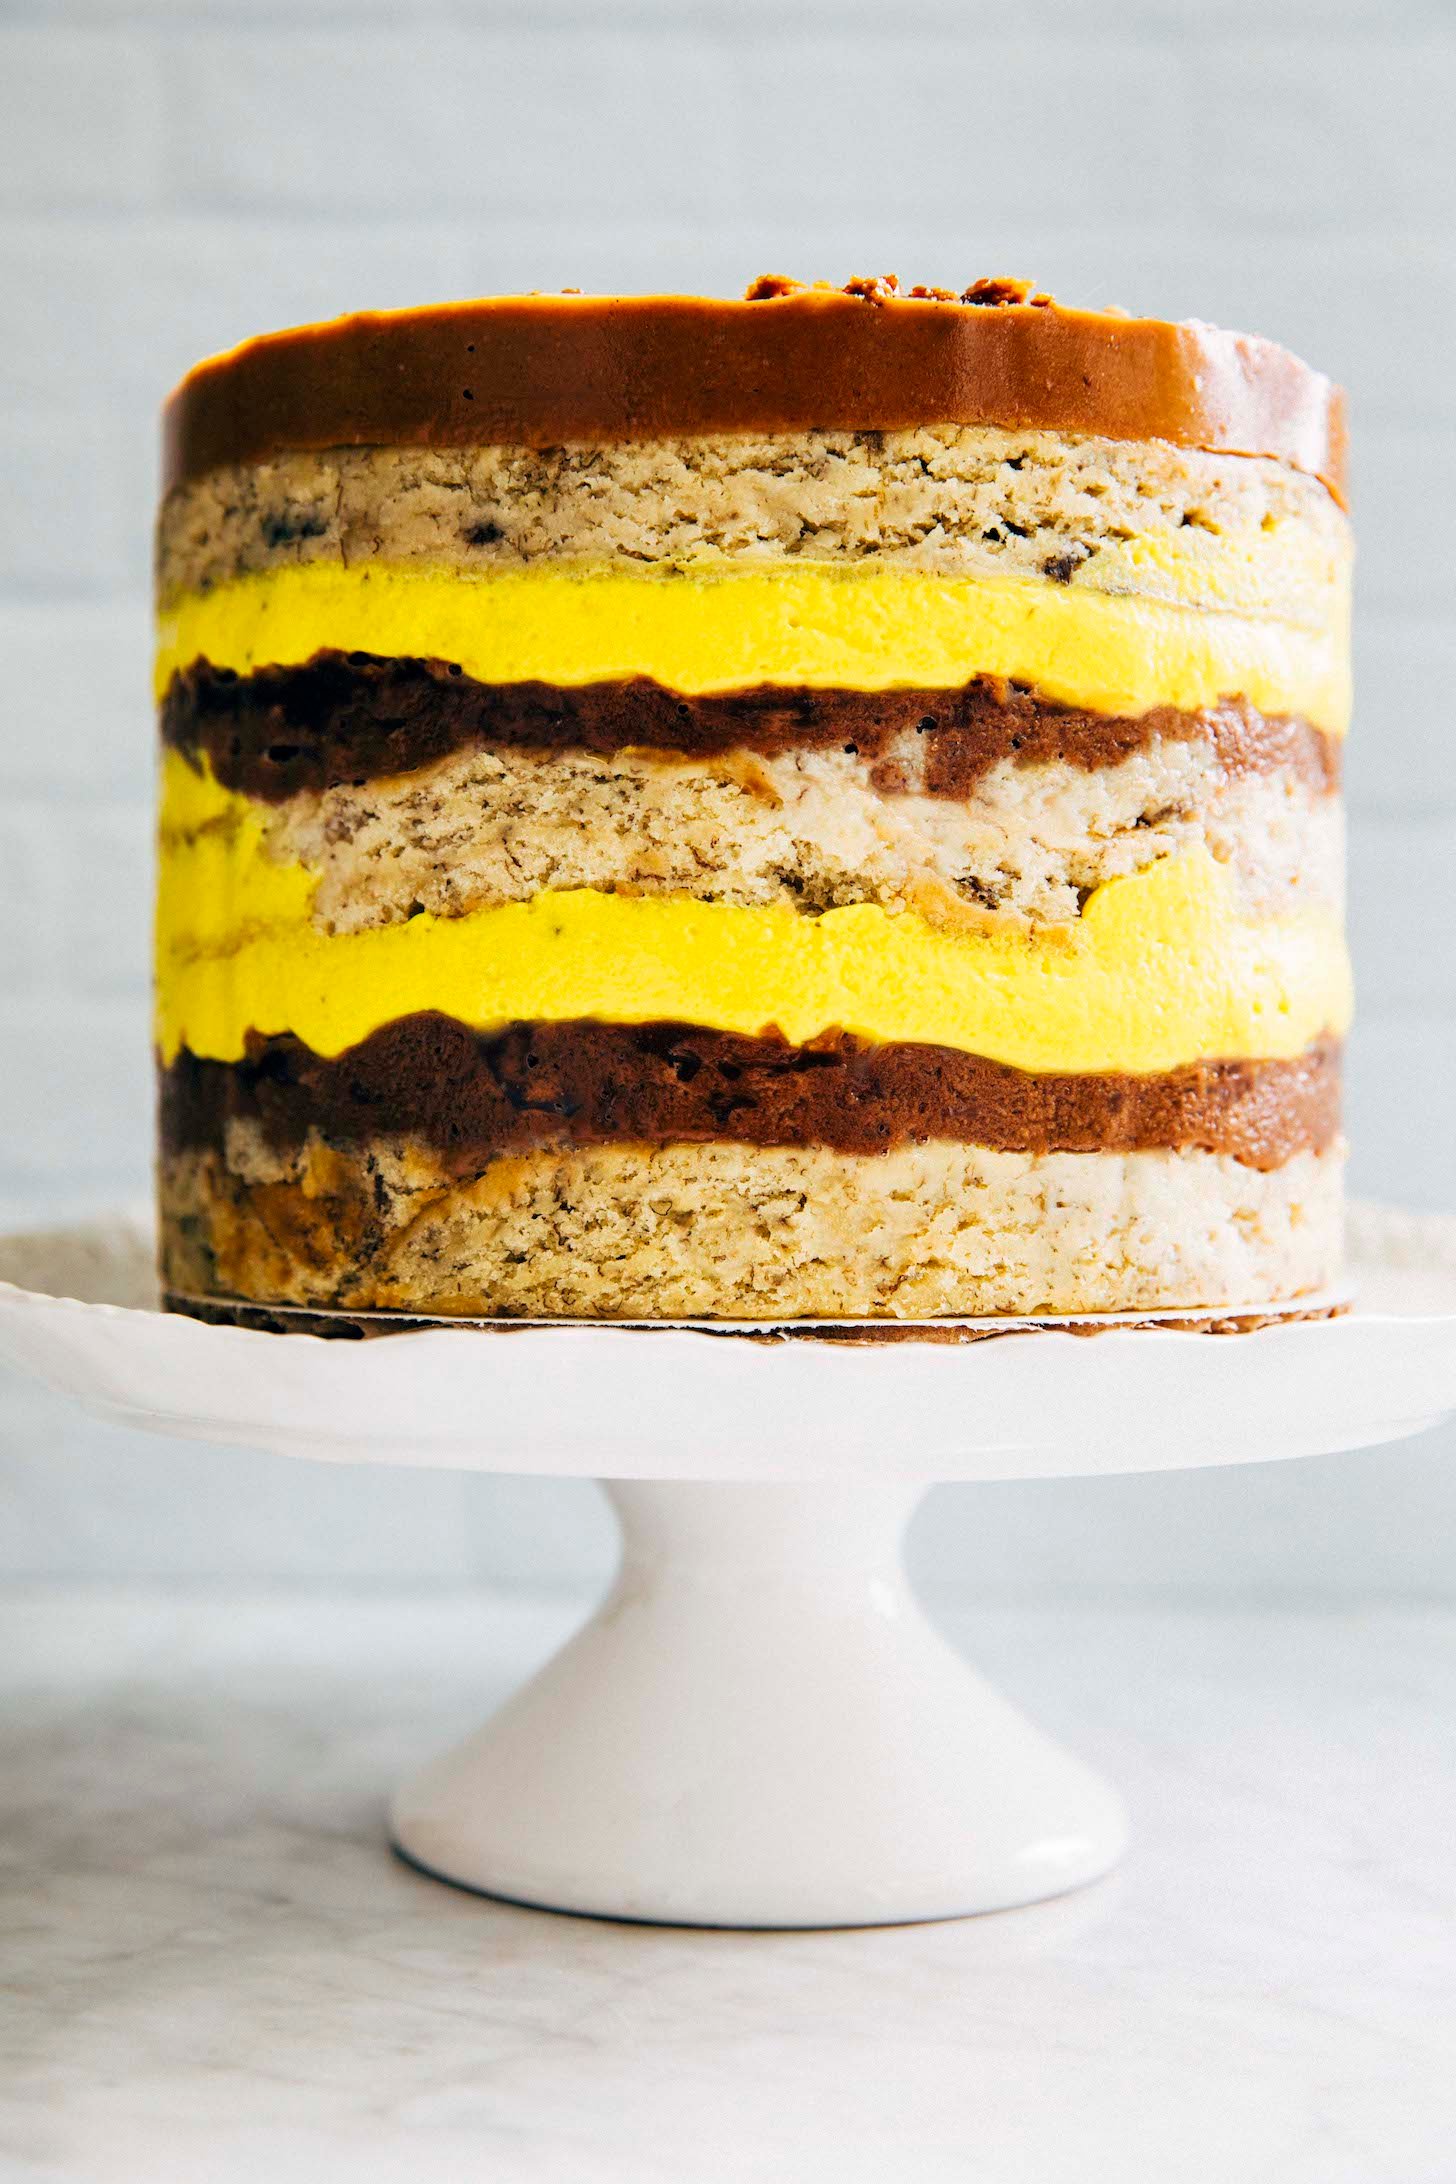
This Milk Bar banana layer cake was one of Milk Bar Bakery’s most famous layer cakes. The showstopping cake is made with many, many layers: plush and moist milk-soaked banana cake, topped with layers of creamy banana cream pudding, crunchy hazelnut brittle, decadent chocolate hazelnut ganache, and nutty hazelnut frosting.
If you love all kinds of textures in your cake, this recipe is for YOU! The cake is deliberately left unfrosted like a naked cake so that you can see all those delicious layers.
Looking for more Milk Bar cake recipes? Check out my tutorials for the famous Milk Bar Birthday Cake and the Milk Bar Chocolate Chip Cake!
A Recipe From Christina Tosi Herself, With Help From Yours Truly
I adapted the recipe from Milk Bar bakery owner, Christina Tosi, and her cookbook Milk: Momofuku Milk Bar. I’ve wanted to make this recipe for years—literally since when I first bought the book in 2011. However, I was always intimidated.
Why? The recipe contains a lot of specialty ingredients. It also has a lot of “recipes within the recipe” that you need to plan for.
Luckily, it’s a lot easier to get some of these “specialty” ingredients today. And thanks to all the years I’ve spent blogging (and writing my cookbook!), I’m a much more experienced baker. I’ve used my experience to write this guide to help you make this advanced cake recipe—no matter your skill level!


Breaking Down The Recipes, Layer By Layer (With A Schedule!)
I mentioned that the Milk Bar banana layer cake recipe was made with the following layers:
- Banana Cake
- Chocolate Hazelnut Ganache
- Hazelnut Brittle Crunch
- Banana Cream Pudding
- Hazelnut Frosting
You’ll need to make 5 different sub-recipes (for the cake, ganache, brittle, pudding, and frosting) to make the entire cake.
Not So Fast—There’s More (7 Mini Recipes Over 4 Days)
At least, that’s what I first thought! But then I looked at the recipe more closely. I realized the chocolate hazelnut ganache recipe required a homemade fudge recipe, while the hazelnut crunch recipe required a homemade brittle crunch recipe.
So instead of the 5 sub-recipes I initially thought I was making, I actually needed a total of 7 recipes to make this 1 cake—yikes! You can see why I avoided it for so long.


A Realistic Home Baker’s Schedule For Making The Milk Bar Banana Layer Cake
But luckily, breaking down complicated, time-consuming recipes was the subject of my first cookbook, Weeknight Baking. And based on the theory in my book, I recommend you don’t make everything at once. Instead, you NEED to plan ahead and make some of these mini recipes in advance. Here’s what I recommend:
- Day 1: Make the Fudge Sauce (needed for the Chocolate Hazelnut Ganache), Hazelnut Brittle (needed for the Hazelnut Crunch), and Hazelnut Crunch Recipes
- Day 2: Make The Banana Cake and The Banana Cream Pudding Recipes
- Day 3: Make the Chocolate Hazelnut Ganache Recipe, Hazelnut Frosting Recipe, and Assemble The Whole Cake
- Day 4: Thaw, Serve, and Enjoy!
My schedule above breaks down the recipe over 3 days (well, 4, if you count thawing and serving it). You’ll likely need to spend 1 to 2 hours over those 3 days making each of the mini recipes.
If that sounds like a lot, I get it. But hey, this is an advanced, professional bakery-style cake we’re talking about here! It beats spending 8 hours straight in the kitchen, right? But if you’re unconvinced, check out Hummingbird High‘s Cake Recipe collection for quicker and easier layer cake recipes!


Now, Let’s Talk Ingredients
Although the Milk Bar banana layer cake recipe uses standard baking ingredients like flour, eggs, and butter, you do need some specialty ingredients. Here’s a summary of what you won’t be able to find at an average grocery store (and my tips on where to find it instead):
Specialty Ingredients In The Recipe (With My Recommendations, Sources, and Substitutions)
- Hazelnut Paste. The best hazelnut paste is made with hazelnuts and nothing more. Watch out for brands that cut the hazelnuts with almonds or sugar! You want something 100% hazelnuts only.
I used this 100% Crema Di Nocciole from Italy and recommend it! Just note that you’ll need 2 (6.2 ounce) jars since you need slightly more than that for this recipe! You can also just buy this 8-ounce jar instead (though I can’t personally recommend it since I used the other brand).
- Feuilletine. Feuilletine are the crispy, dried crepe flakes that give this Milk Bar banana cake its signature crunch. I used Cocoläat Feuilletine—it was the cheapest option, and I had plenty leftover for other baking projects!
- Gianduja Chocolate. Gianduja chocolate is made by mixing hazelnut paste with milk chocolate to create a soft, fudge-like chocolate. I used Valrhona Azelia feves (learn more about my favorite baking chocolates in this post). I’ve also used Caffarel Gianduja and Venchi Gianduja truffles in past baking projects.
- Banana Extract. Banana extract gives the banana cake in this recipe a flavorful boost. Banana extract is typically available in the baking aisles of most major grocery stores. I used McCormick Banana Extract.


How To Assemble A Milk Bar Layer Cake (With Photos!)
A Milk Bar layer cake isn’t assembled the same way as a traditional layer cake. Instead, the recipe instructs you to bake the cake as a sheet cake. You then use a pastry ring to cut out the cake layers, then stack everything inside the pastry ring.
Fat Daddio 6-Inch Cake Ring With 3-Inch Tall Sides
This is the cake ring I used to make this Milk Bar banana layer cake recipe! I like it because it has no seams, making perfectly smooth sides.
Check it out below:
Stamping Out The Cake Layers


Building The Cake Inside The Cake Ring
In addition to using the cake ring to stamp out the cake layers, you also need it to hold the cake together. The recipe instructs you to layer the cakes and components like the Chocolate Hazelnut Ganache, Hazelnut Crunch, Banana Cream Pudding, and Hazelnut Frosting inside the cake ring.
Here’s what that looks like:


Unmolding The Cake
You’ll need to buy acetate paper to line the inside of the cake ring. The acetate paper makes it easy to unmold the cake from the ring.
Back when I first started making these cakes (see this Milk Bar Birthday Cake and this Milk Bar Chocolate Chip Cake), the only readily available acetate paper you could buy online was used for presentations/slideshows. Now, you can easily buy acetate cake collars—make your life easy and buy a roll!
4-Inch Tall Acetate Cake Collars
Use this cake collar to line the inside of your cake ring! The acetate paper is 4-inches tall, perfect for the 3-inch sides of the cake ring.


My Best Recipe Tips
Working Even Smarter
I already told you the schedule to help you make this Milk Bar banana layer cake recipe over a few days. But I have even more time-saving tips:
- My recipe below instructs you to make the Fudge Sauce, Hazelnut Brittle (which is needed for the Hazelnut Crunch), and Hazelnut Crunch all in one day. Make the Hazelnut Brittle first to give it time to cool before using it in the Hazelnut Crunch. As it cools, make the Fudge Sauce. By the time you’re done making the Fudge Sauce, the Hazelnut Brittle should be ready to go!
- My recipe below instructs you to make the Banana Cake and Banana Cream Pudding in one day. The banana cream pudding needs to be completely cool before completing the last step (which is to whisk it into sweetened whip cream). So here’s what I did to save time: first, I made the banana cream pudding base recipe up until the point where it needed to be cooled before whisking into the cream. Then, as I refrigerated it, I baked the banana cake. By the time I was done baking the banana cake, the banana cream pudding had chilled completely and was ready to be whisked into the whipped cream!
About Ingredients
- This recipe works best if you use incredibly ripe, spotted, and almost black bananas. How ripe should bananas be for banana bread? VERY ripe. Like “leaving them on the counter for another day is a bad idea because it would attract too many fruit flies” ripe.
- You’ll have a tiny bit of hazelnut brittle and fudge sauce leftover after making the Hazelnut Crunch and Chocolate Hazelnut Ganache. Use the brittle in your favorite cookie recipe (see inspiration in my Cookie Recipes archive, and the fudge scaue in your favorite coffee drink! Check out some of my favorite coffee drink recipes in my Drinks archive.
About Baking Equipment You Need
In the book, Christina Tosi writes that you need two rectangular sheets of acetate paper to make the cake, each 20 inches long and 3 inches tall. You can cut a sheet of acetate paper to that size, or buy a roll of a 3-inch or a 4-inch inch tall acetate cake collar paper and cut a 20-inch length of it. The height of the cake collar doesn’t matter too much—you can even buy a 6-inch or an 8-inch tall roll, which will work well with the recipe since the resulting cake is around 6 inches tall.
However, there are pros and cons. Using a taller roll of acetate paper will eliminate the need to use the two cake collars as instructed in the recipe below. However, it will also make it much harder to build the base and second layer. The taller sides of the acetate paper will get in the way as you spread the frosting on the different layers!
How To Get The Most Perfect Layers
The original recipe is also pretty vague about dividing up the frostings and crunch between the layers. The book only gives you rough estimates (e.g. “Use half of the frosting for the bottom layer”) as opposed to giving you exact volume or weight measures for each layers. So the first time I made this cake, it was wildly uneven! I ended up using way more frosting for the first layer, and ran out by the time I needed to frost the rest of the cake. Similarly, I used way too much soak and crumbs in my bottom layer versus the middle layer.
So when adapting this recipe for Hummingbird High, I made sure to give you EXACT weight measures of the different components needed for each layer. Doing so ensures an even, perfect cake with just the right textures and quantities for each layer! I mean, truthfully, you can probably just eyeball it too. But why not just strive for perfection?
Get the Recipe:
Milk Bar Banana Layer Cake
This Milk Bar banana layer cake features moist banana cake, banana cream pudding, hazelnut crunch, chocolate ganache, and hazelnut frosting. A showstopping, texture-packed dessert for special occasions and serious home bakers!
Prevent your screen from going dark
For The Fudge Sauce (Needed for the Chocolate Hazelnut Ganache)
For The Hazelnut Brittle (Needed for the Hazelnut Crunch)
For The Banana Cream Pudding
For The Chocolate Hazelnut Ganache
For the Hazelnut Frosting
Day 1: Make the Fudge Sauce, Hazelnut Brittle, and Hazelnut Crunch
-
Make the Fudge Sauce. Combine the chocolate, cocoa powder, and salt for the fudge sauce in a medium bowl.Combine the corn syrup, sugar, and heavy cream in a heavy-bottomed sauce pan and stir intermittently while bringing to a boil over high heat. The moment it boils, pour it into the bowl with the chocolate. Let sit, undisturbed, for 1 full minute.Slowly begin to whisk the mixture. Continue whisking, increasing the speed of your whisking every 30 seconds, until the mixture is glossy and silky-smooth. This will take 2 to 4 minutes, depending on your speed and strength.Use immediately or store it in an airtight container in the fridge for up to 2 weeks; do not freeze.
-
Make the Hazelnut Brittle. Line a quarter sheet pan with a silicone baking mat (parchment will NOT work). Heat the sugar for the brittle in a small heavy-bottomed saucepan over medium-high heat. As soon as the sugar starts to melt, use a heatproof spatula to move it constantly around the pan—you want it all to melt and caramelize evenly. Cook and stir until the caramel is a deep, dark amber, 2 to 3 minutes.Once the caramel has reached the target color, remove from the pan from the heat and, with the heatproof spatula, stir in the hazelnuts. Make sure the nuts are coated in caramel, then dump the contents of the pan out onto the sheet pan. Spread out as thin and evenly as possible. The caramel will set into a hard-to-move-around brittle mass in less than a minute, so work quickly. Let the brittle cool completely.Once cool, use a food processor to break the brittle up into pieces the size of short-grain rice. Store in an airtight container and use within a month.
-
Make the Hazelnut Crunch. Combine the hazelnut paste for the crunch, hazelnut brittle, feuilletine, confectioners’ sugar, and salt in the bowl of a stand mixer fitted with the paddle attachment. Beat on medium-low speed for about 1 minute, until homogenous. The crunch can be stored in an airtight container at room temperature for 5 days or in the fridge for up to 2 weeks.
Day 2: Make The Banana Cake and Banana Cream Pudding
-
Make the Banana Cake. Position a rack in the center of the oven and preheat the oven to 350°F. Generously spray a quarter sheet pan with cooking spray and line the bottom with parchment paper, leaving a 2-inch overhang on the pan’s two long sides. Spray the parchment, too.In a medium bowl, whisk together the flour, baking powder, baking soda, and salt for the banana cake.In the bowl of a stand mixer fitted with the paddle attachment, combine the butter and sugar for the banana cake. Beat on medium until light, fluffy, and doubled in volume, 2 to 3 minutes, using a rubber spatula to scrape down the bottom and sides of the bowl as necessary. Reduce the mixer to low and add the egg, scraping down the bottom and sides of the bowl after the addition. With the mixer on low, slowly pour in the buttermilk, followed by the oil and banana extract. Increase the mixer speed to medium-high and beat for 5 to 6 minutes until the mixture is practically white, twice the size of your original butter-and-sugar mixture, and completely homogenous. You’re basically forcing too much liquid into an already fatty mixture that doesn’t want to make room for it, so if it doesn’t look right after 6 minutes, keep mixing. Stop the mixer and scrape down the sides of the bowl.On very low speed, add the bananas and mix for 45 to 60 seconds to ensure all the bananas are broken apart.Still on very low speed, gradually add the dry ingredients and beat until just combined. Scrape down the bottom and sides of the bowl once more, and beat on low for an additional 30 seconds.Pour the batter into the prepared pan and use an offset spatula to smooth its top if necessary. Bake for 25 to 30 minutes. When done, the top of the cake should bounce back when gently pressed and a skewer inserted into the center of the cake should come out with a few crumbs attached.Cool completely in the pan on a wire rack before storing or using for assembly. To store for later, turn the cake out onto a sheet of plastic wrap. Use the plastic wrap to tightly wrap the entire cake (you may need an additional sheet or two of plastic wrap to cover it completely). The cake will keep, at room temperature, for up to 1 day before you need to use it for assembly. The cake will also keep in the freezer, wrapped in an additional layer of aluminum foil, for up to 3 months.
-
Make the Banana Cream Pudding. Combine the bananas, cream, and milk for the banana cream pudding in a blender and puree until smooth. Add the sugar, cornstarch, salt, and yolks and continue to blend until homogenous. Pour the mixture into a medium saucepan.Pour the cold water for the banana cream pudding into a small cup. Sprinkle the gelatin over the surface of the water, covering it completely. Set aside for no longer than 5 minutes while you cook the banana cream pudding.Place the saucepan with the banana cream on medium-low heat. Bring to a boil, whisking continuously, until the mixture is thick and gray.Pour the banana cream back into the blender. Add the bloomed gelatin, butter, and yellow food coloring and blend until completely smooth. Transfer the banana mixture to a heatsafe container, and refrigerate until completely cold.Once cold, combine the cream and confectioners’ sugar in the bowl of a stand mixer fitted with the whisk attachment. Whisk on medium-high until soft peaks form, about 2 to 3 minutes. Add the cold banana mixture to the whipped cream and slowly whisk until evenly colored and homogenous.Use immediately, or refrigerate in an airtight container for up to 5 days.
Day 3: Make the Chocolate Hazelnut Ganache, Hazelnut Frosting, and Assemble The Entire Cake!
-
Make the Chocolate Hazelnut Ganache. Bring the cream for the ganache to a boil in a small heavy-bottomed suacepan over medium-high heat.Meanwhile, combine the melted gianduja, hazelnut paste, fudge sauce, and salt in a medium bowl.Pour the cream into the bowl and let sit undisturbed for 1 minute. With a hand blender or a whisk, slowly whisk the contents of the bowl until the mixture is glossy and silky-smooth. This will take 2 to 4 minutes, depending on your speed and strength.Use immediately, or refrigerate in an airtight container for up to 2 weeks.
-
Make the Hazelnut Frosting. Use a handheld electric mixer to beat the butter for the frosting in a medium bowl until completely smooth. Add the hazelnut paste, confectioners’ sugar, and salt. Continue mixing on medium-high speed until the frosting is fluffy and has no lumps in it, around 3-4 minutes, scraping down the bottom and sides of the bowl occasionally with a rubber spatula.Use immediately, or refrigerate in an airtight container for up to 2 weeks.
-
Assemble the Milk Bar Banana Layer Cake. Put a piece of parchment or a silicone mat on the counter. Invert the Banana Cake onto it and peel off the parchment from the bottom of the cake. Use a 6-inch cake ring to stamp out 2 full circles and 2 half circles from the cake. The whole circles are your top 2 cake layers. The 2 half circles and remaining cake “scrap” will come together to make the bottom layer of the cake.Clean the cake ring and place it in the center of a sheet pan lined with clean parchment paper. Line the inside of the cake ring with the acetate paper (if using two strips of acetate paper, just use one strip).Nestle the two half circles in the cake ring, pressing their round sides against the cake ring. There will be a gap in the middle of the circles—this is totally okay, I promise! Fill the gap between the two half circles with the remaining cake scraps. Use the back of your hand to press the scraps together to fit into the space. Head’s up that you’re going to have more scraps than can fit in the gap. Simply take the excess scraps and press them down evenly on top of the rest of the cake layer, using the back of your hand to create a flat and even layer. At this point, the acetate collar will start to wrinkle from the pressure of the cake. Don’t worry about it too much! It will even back out when you add the middle and top layer.Use a pastry brush to brush half of the milk for assembly over the layer. If using a digital scale to weigh out the soak, you’ll need approximately 1 ounce (30 grams) of milk for this layer.Use the back of a spoon or a small rubber spatula to spread ½ of the Chocolate Hazelnut Ganache as evenly as possible over the soaked cake. If using a digital scale to weigh out the frosting, you’ll need approximately 3.75 ounces (106 grams) of ganache for this layer.Sprinkle ⅓ of the Hazelnut Crunch evenly over the ganache. If using a digital scale to weigh out the crunch, you’ll need approximately 1.7 ounces (48 grams) of crunch for this layer.Use the back of a spoon or a small rubber spatula to spread ½ of the Banana Cream Pudding as evenly as possible over the crunch. If using a digital scale to weigh out the cream, you’ll need approximately 6.5 ounces (284 grams) of banana cream for this layer.If you’re using two acetate cake collars, gently tuck the second strip of acetate between the cake ring and the top ¼ inch of the first strip of acetate. Doing so creates a ring of acetate that is 5 to 6 inches tall, combined—this will be high enough to support the height of the finished cake. Set a cake round on top of the banana cream. If one of your cake rounds is jankier than the other, use it in the middle and save the pretty one for the top! Use a pastry brush to brush the remaining half of the milk over this cake. Use the back of a spoon or a small rubber spatula to spread the remaining ½ of the Chocolate Hazelnut Ganache (3.75 ounces or 106 grams) as evenly as possible over the soaked cake. Sprinkle ⅓ of the Hazelnut Crunch (1.7 ounces or 48 grams) evenly over the ganache. Use the back of a spoon or a small rubber spatula to spread the remaining ½ of the Banana Cream Pudding (6.5 ounces or 284 grams) as evenly as possible over the crunch. Set the final cake round on top of the banana cream. Cover the top of the cake with all the hazelnut frosting. Garnish the frosting with the remaining clusters of Hazelnut Crunch (there should be around 1.7 ounces or 48 grams left).
-
Freeze the cake. Transfer the sheet pan with the cake to the freezer. Freeze, uncovered and fully assembled, for a minimum of 12 hours to set the cake and all its fillings. The cake will keep in the freezer for up to 2 weeks.
Day 4: Serve and Store
-
Thaw the cake, then serve. At least 3 hours before you are ready to serve the cake, pull the sheet pan out of the freezer and use your fingers and thumbs to gently pop the cake out of the cake ring.Transfer the cake to a serving plate or cake stand. Gently peel off the acetate. Defrost in the fridge for a minimum of 3 hours (or 1 hour at room temperature) before serving.
-
Store the cake. The assembled cake will keep, uncovered in the refrigerator, for up to 1 day. After that, tightly wrap in plastic wrap and refrigerate for an additional 3 days. Leftover slices can be stored in an airtight container in the fridge.
Share this content:


Post Comment